Saturday 30 June 2012

Crostini

Following the post on fresh made bread, I couldn't resist but to put up something on crostini. The fun with crostini is that this crunchy and tasty appetizer can be the subject of a whole multitude of flavours, here is a simple recipe with endless possibilities!

For the actual crostini:

-Sliced bread
-Good olive oil
-A clove or two of garlic

1)Preheat oven to 400 and line a cookie sheet with parchment paper. Slice the bread in a relatively thick slice but no bigger than any bread sliced for a toaster.
2)Crush the garlic cloves so that their juice emerge, rub them against each piece of bread.
3)Brush each slice lightly on each side with some olive oil
4)Bake for 8 minutes at 400
5)Upon removing decorate with one of the following mixes:

Pear and smoked ham crostini:
-Thinly sliced asian pear
-Smoked ham
-Fresh chard
-Ricotta
-red onion


Raspberry portobellow crostini:
-Ricotta (preferably home made)
-Raspberry Jam (home made too optimally!)
-Fried portobello mushrooms
-Sliced green onions


Fig and mascarpone crostini:
-Fresh figs
-Mascarpone
-Aragula
-Prosciutto
-Balsamic vinegar and oilve oil vinaigrette drizzled on top (the ratio is up to you, I add honey too!)
Green apple and smoked turkey crostini:
-Thinly sliced green apple
-Smoked turkey
-Sharp cheddar
-Honey

No-knead Table Bread


This bread, as bread goes, is wonderful in its simplicity, full of alveoles, soft and chewy it makes a fantastic table bread for a tasty dinner. Although I love sourdough above all else, sometimes I find myself without my loyal starter so I turn to this as an easily thrown together table bread, all it needs is some patience!


Ingredients:
Prep. Time 30 min.
Waiting time: About 21 hours total
Bake time: About 20 min.

-4c. flour  (White flour will provide a big, tasty, fluffy bread with, wholewheat flour make for a far heavier but more nutritious loaf, great for toasting with peanut butter. If you're just starting out, I suggest giving white a go)
 -2tsp salt
-2c. room temperature water 
-3/4tsp instant yeast


Combine salt, flour and yeast making sure that the salt and yest don't come in direct contact at first, I simply pour them on opposite end of the bowl of flour and then stir it all with a fork.

Add the water, you can simply take it from the tap but remember that you don't want it too cold as that will delay fermentation

It might feel too moist at first or too dry later but if you just keep mixing it, it'll work out, trust the quantities, just mix it together with a rubber spatula or wooden spoon until it's roughly homogenous.

Now cover the bowl it's in (it should just take up the bottom of the bowl, say 1/4 or a third to allow it to rise) with a damp (but not wet) clean dishtowel or a tupperware lid that fits the bowl. Make sure the towel wrap is far from touching the loaf.

Let it sit at ambient temperature, aim for 22 degrees celsius, for 18 hours, if you're having trouble controlling temperature, stash it in a small room/closet with temperature control.

After 18 hours have elapsed, coat a large baking pan (or even better, a stone, tile or even a dutch oven!) with parchment paper or a generous dusting of flour and deflate the very wet and sticky dough by unsticking it from the walls and shaping it into a ball with a spatula or spoon. Don't worry about punching it down like one might with other breads, it isn't necessary for this one. Feel free to add a bit of flour as you work to prevent it from sticking to your hands.

shape the dough into one large loaf if following the horizontal axis of the pan, or into two smaller ones, as this dough is very wet, don't worry about stretching it into a certain shape, it will widen as it rises.

once this is done let the dough rise another hour or two.

Near the end of the 2-3 hours preheat your oven to 450-500 fahrenheit. When its fully preheated and the bread has risen, dust the top of your bread with flour (Or cornmeal/sesame seeds/poppy seeds) Spray water into the preheated oven using an atomizer or throw some water into the base.You can also put some ice cubes in the oven with the bread. The steam will guarantee a fantastic crust.
Half brown, half white loaves, just waiting for some good olive oil or fresh butter...


Bake for 12-20 minutes until browned and risen. Attempt not to open the oven while they bake the first 10min and if you do open it, add mist every time as steam will escape. If you do open the over watch your eyes as the escaping steam can burn them! It is also very important to watch out for the smell of burning, at this temperature the bread cooks very fast! Also, only put one baking sheet at a time for good heat dispersion. Once you pop the loaves out, let them cool for at least ten minutes... it's tough but worth it.


Sunday 24 June 2012

Spring Rolls and Peanut Sauce

This light and tasty recipe was something I had some experience with. Aside from being tasty, healthy and requiring very little actual cooking, my dear friend Lea recently brough to my attention the fact that they also make fantastic fun food to eat with friends. By plopping all the components down in the middle of the table, people can make their own including their favorite vegetables granting you an easy way out when entertaining! Lea includes cooked noodles in hers, but I tend to stick to just throwing in more veggies, ultimately, as usual, it's up to you!


Spring Rolls

Makes 8 rolls

Ingredients:
-8 round rice paper wrappers
-4 large leaves of romaine lettuce
-5 radishes
-1 large yellow onion
-1/3c. cucumber
-1 red pepper
-3 green onions
-3/4c. bean sprout
-half a pound of extra firm tofu
-2tbsp. oyster sauce
-1 tsp. honey
-1tsp. peanut oil

Peanut Sauce:
-2 tsp soy sauce
-2 cloves garlic
-1/2 c. pure peanut butter (just peanuts)
-1 tbsp. brown sugar
-a dash of salt
-3 tbsp. + water
-2tbsp crushed peanuts (optional)
-1tsp. peanut sauce
-1tsp. rice vinegar

1) Slice yellow onion into rounds, add to pan with peanut oil and fry on medium heat, as it begins to cook, cut the tofu into rectangular strips, add to onions as soon as they begin to really become fragrant.
2)Add honey and oyster sauce to the tofu and onion mix, stir and let cook until onions are golden and tofu has been heated through.


3)While cooking the tofu mix, begin concocting the peanut sauce in a small pot, first begin by mincing the 2 cloves of garlic and heating them in the peanut oil until fragrant.
4) Add the initial 3tbsp. of water as well as the peanut butter to the garlic, cook at low heat and mix vigorously until homogenous.
5) Add the rest of the ingredients to the mix and simmer at low heat for 5 minutes to meld the flavours together, parcel into little dipping cups.


6) Now that the tofu mix and the peanut sauce is ready its only really a matter of cutting the veggies up! Slicing the red peppers and cucumbers into strips, tearing the romain, dicing the green onions and slicing the radishes tends to be how I go about as seen here:


7)Once this is done, you can just just deck out the table with everything into little dipping cups cups. After this, the only thing left to do is bring a large bowl of warm water to the table and quickly dip the rice papers in the water, leaving them only for a few seconds, don't leave them too long though, they'll soften too much and fall appart! After doing this its only a matter of filling them like a burrito or fajita, rolling them and closing the ends off, the wet rice paper will cling to itself and seal.
8)Dip in peanut sauce and dig in!

Thursday 21 June 2012

Yogurt Parfaits With Honey Maple Granola

Ahhhh breakfast, the lovely meal of extremes, a meal which I am normally tempted either to skip or smother with pancakes, bacon, eggs and a pile of other time consuming, delicious foods dripping with fat and tasties. In an effort to reform my ways, a wonderful compromise was made in my kitchen this morning, one involving lots of yogurt and plenty of fruit! What makes these parfaits perfect? The fact that while filling all criteria of tastyness and semi-healthiness, they can also be prepared in advance! Enjoy!


Fruit Puree

Makes about 2 servings (Per recipe, I made 2, one mango, one cherry)

Ingredients:

Mango puree:
-5tbsp water
-1tbsp brown sugar
-a heaping half cup of frozen mangoes

For the cherry puree, I used the same quantities with the exception that I only put 2tbsps of water.

1)Throw water and fruit into a small pot, heat until fruit turns soft
2)Add brown sugar, miss thoroughly
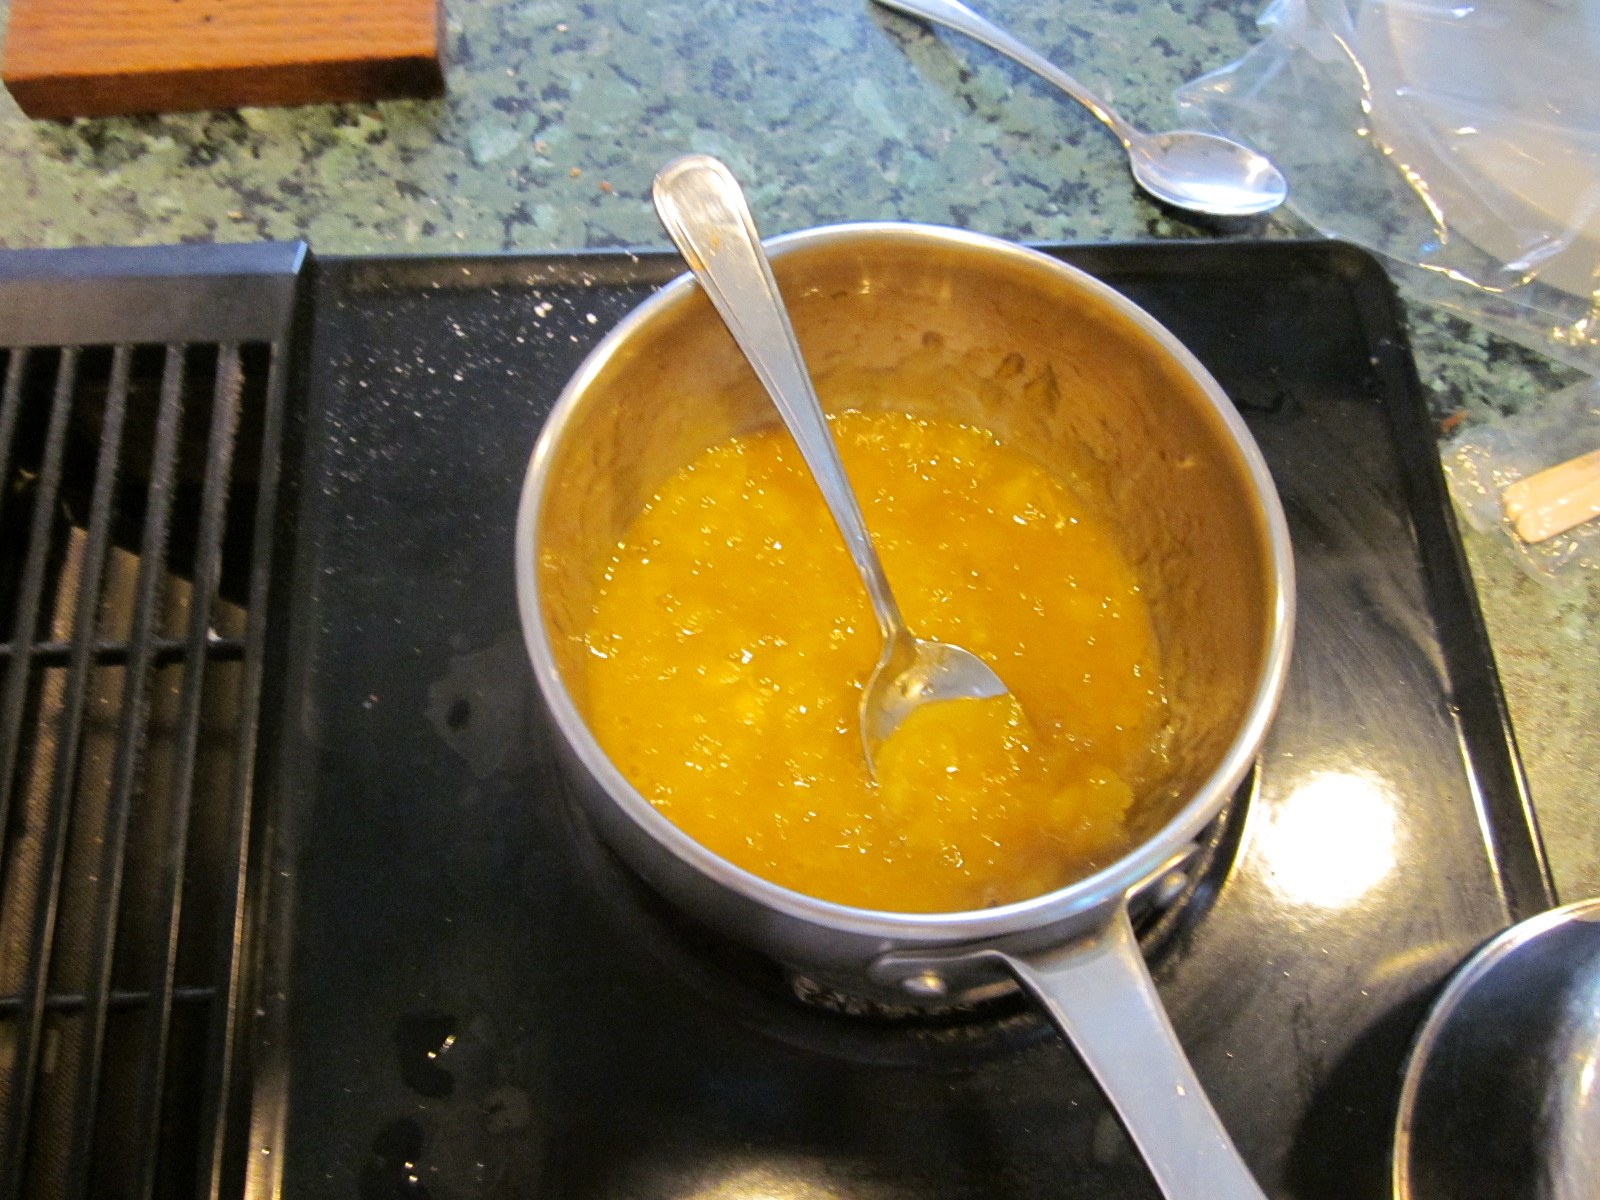
3)Simmer at low to medium heat for 10 to 15 minutes while crushing with a potato masher/fork/whatever is available

The puree should reach a state like this:


Once it has reached this point, let it cool, puree can be stored in fridge for a week or so and can be canned to last indeterminately!

At this point I could just tell you to layer it into some plain yogurt, mix it with some granola and tell you that you're golden! Right? Right!? WRONG!!!!

Seriously....make yourself some granola...even better, make yourself some yogurt!

Now for a granola recipe: this little mix is quite simply a blend of many things which I love to eat with breakfast! Feel free to experiment yourself, just remember to use fat, sugars, grains and to stir it! In addition to being awesome and full of nutrients, granola has the wonderful benefit of making lovely gifts! So buckle in and prepare to make yourself some tasty granola which is more flavorful, healthier and cheaper than the rubbish you buy at the grocery!


Honey Maple Nut Granola:
Prep time: 10 minutes
Bake time: 20 min.
Cool time 20 min.
Servings as topping:8-10

Preheat oven to 350 Fahrenheit

Ingredients:

1/3 c. Butter
1 tsp. Vanilla
3 tbsp. Honey
3 tbsp. Maple Syrup
2 tbsp. Brown Sugar
1/2 tsp. Salt
2 c. Oats
3/4 c. Almonds
3/4 c. Walnuts
4 tbsp. Flax Seeds
1/4 tsp cinnamon
Hefty pinch of nutmeg
1 tsp. Canola oil (for greasing)

1)Grease a cookie sheet, preferably one with a rim
2)Melt butter on stove, take off heat and add vanilla, sugar, maple syrup, salt and honey.
3)Coarsely chop almonds and Walnuts and grind flax seeds very fine
4)Combine nuts, flax and oats
5) Mix wets and dries, spread out over the cookie sheet
6)Bake for 20 min.
7) After 10 minutes, stir mix very well, stir again 5 minutes later.
8) Remove from oven, let cool.
9) Enjoy!

The Actual Parfaits:

Once you have your yogurt, granola and syrup made, its only a matter of mixing it all together, cut up fruit optional (I used local strawberries).

Take a tall parfait glass or other decorative glassware, fill the base with one puree, add a layer of yogurt, some fresh fruit, more yogurt and the other puree (rinse and repeat as high as you can make it). Coat the top layer with puree, decorate with some fresh fruit and coat generously with granola. Bon appétit!


Sunday 17 June 2012

Lentil Hummus


In recent years, in an effort to improve my eating habits I've come to adopt a diet heavier in fruit, vegetables and grains. Although my absolute love of animal products (Read cheese and anything off a pig) has prevented me from making the leap to full-fledged vegetarianism I still attempt to drastically reuce my consumption of animal proteins in all forms. However, this lack of protein as well as my reluctance to simply replace everything with soy left me in a nasty bind lacking protein in a bad way. The search for quick, affordable, tasty and lean sources of protein has led me to spawning a few different recipes chief amongst these recently has been lentil hummus. This recipe is simple, tasty and makes an excellent summer dip to be shared with friends or packed into a lunch with some veggies! Anywho, I've puttered on enough, here's the recipe, hope you enjoy it!

Ingredients:
-1c. dried brown or orange lentils
-3 small onions
-1 large clove garlic
-1/2 tsp. salt
-1/4 c olive oil+1tsp.

1) Cook lentils until thoroughly softened
2) Peel, crush and let garlic sit while you slice onions
3)Cook the onions, the garlic and the tsp. of oil until soft and browned, let cool.
4) Pulse all ingredients slowly in a food processor while slowly drizzling oil in as needed. Feel free to add anoth 1/4c. of oil or so to the mix for a smoother result than the one pictured.

This recipe is made to serve as a basic template for hummus, to add some umph to the recipe I reccomend a few alternative seasoning combinations:
-sundried tomatoes and basil
-cilantro and lime juice
-parsley and lemon
-raisins and cumin
-garlic and chilis

Or just experiment yourself!

Saturday 16 June 2012

Radish and Watermelon Salad


As the oppressive heat of summer truly begins to set in, starting up the oven, the stove and even the barbecue can seem to be too much. For these reasons I absolutely love to have some light salad recipes on standby. To me, nothing quite characterizes late spring and early summer as well as this light and extremely easy salad, prepared from all manner of seasonal fruits and veggies.


Ingredients:

-‎4 medium sized radishes
-1/2 a red onion
-1/2 a cucumber

-some freshly cracked black pepper
-juice of half a lemon
-1 tsp of good olive oil
-2 cups of watermelon
-~2 tbsp of chopped garlic chives

1)Wash and prep vegetables slicing the radishes, onion and cucumber into thin rounds with a mandolin and mixing them together into a salad bowl.
2)Chop the watermelon thinly and lay it on top of the mixed vegetables.
3)Coarsely chop some fresh garlic chives, chives or green onion stems (I just used what I had in the garden) and add to the salad.
4)Combine the lemon juice and the olive oil, mixing vigorously or shaking it in a jar, pour over the salad before adding some freshly grated black pepper.
5)Mix vigorously, serve and enjoy!