Wednesday 25 December 2013

Salted Caramel Popcorn Nut Medley

Ahhhh caramel corn, the finger food of happy holidays, satisfyingly sweet and ever crunchy. To me caramel corn evokes memories of my grandmother who used to make it with a sticky caramel of thick molasses which would just get absolutely everywhere! Even with gummy fingers and the occasional tenacious bit of popcorn stuck in our teeth, the entire family has great memories of candy corn, how can we not? Caramel corn is nana's kitchen, going further back in time it's crackerjack, poppycock and carnival candy, the artful twist of old time confectioners, a mouthful of elegantly exploding caramel combined with the good old country charm of popcorn. This caramel is an upscale and modern twist on the old treat, out is the thick molasses and pauper's peanut, in is the rich buttery salted caramel and a vibrant mixture of exotic nuts. THIS, this, is a decadent recipe for the holidays!


This recipe is inspired by the caramel corn in Thomas Keller and Sebastien Rouxel's Bouchon Bakery cookbook. If you ever have a chance, do take a gander at their beautiful book!


While we're at it with the disclaimers, do keep a candy thermometer handy to closely monitor the temperature to your caramel. Remember, good caramel is a science!

You'll need:
-1/2 c. Water
-1c. + 2 tbsp. Granulated Sugar
-1/2  1tbsp. Brown Sugar
-1/4 c. + 1 tbsp. Light Corn Syrup
-70 g. Salted Butter
-1/4 tsp. Vanilla extract
-2 tsp. Baking Soda
-1 tsp. Salt
-1 3/4c.  Mixed Nuts, salted (I prefer those purchased at costco)
-10 c. Popcorn


Lightly grease a large bowl and a cookies sheet with canola oil
 
Pop all of your popcorn, pour three quarters of it into the large oiled metal bowl, keep the rest close


Combine water, sugars, corn syrup and butter in a large high-rimmed pot, heat on medium-high stirring constantly


Once the caramel reaches about 290 degree Fahrenheit (143 celsius) you can move on to the next stage if you want a chewier caramel, should you prefer a crunchier one, take it up to 300 Fahrenheit (148 celsius).

Mix together the baking soda and salt, add to caramel and continue to stir vigorously, watch out, it will foam!


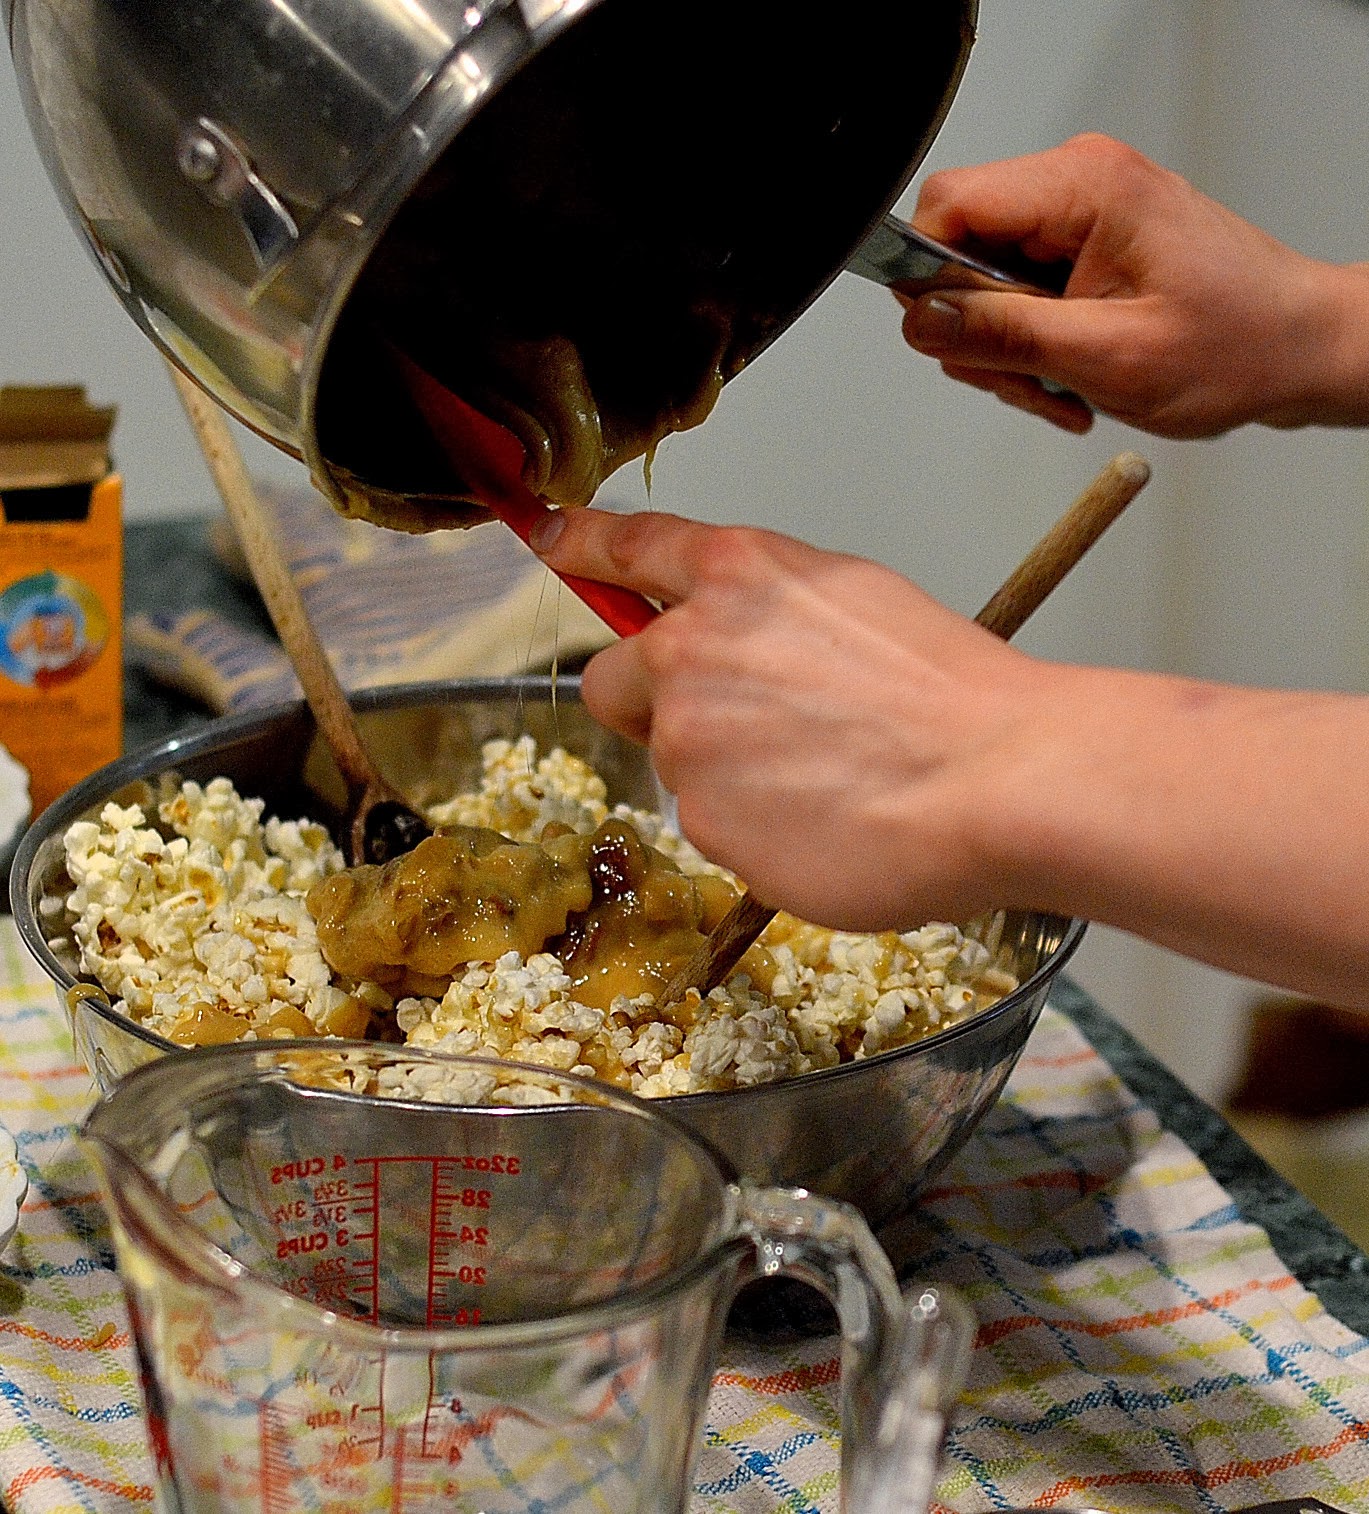
Immediately add nuts to caramel, stir again and pour mix onto popcorn, use a spatula to get it all out, work quickly as it will solidify fast.


Add leftover popcorn on top of the caramel and mix it all quickly, technically you want to be gentle enough as to not crush the popcorn but tough enough to mix the thick caramel in.


 I recommend working with two wooden spoons and make sure not to burn yourself, caramel burns are not fun (This old soldier has the battle wound to prove it to ye')


Once sufficiently mixed, pour popcorn onto the greased baking sheet


let cool 5 minutes, break it all up and store in an airtight container or serve


Monday 2 December 2013

Woodsy Red Wine Mussels with Rosemary

 Red wine with mussels? RED WINE!? I can see the shock spread across your face right now, oh the travesty! Alas, fear not my friends, for I can guarantee that this unconventional mix is indeed delish! Let us not limit ourselves to red wine with red meat, remember that the famed fowl, the coq au vin, is cooked in red wine, so please, be patient with me and give this a read or even better, a try! In this dish the flowery flavour of a nice light red is accompanied by the festive pine aroma of a fresh, fragrant sprig of rosemary in addition to the heady odour of some plump green basil leaves. Combine this some of the usual suspects in the cooking of mussels, the humble carrot and onion. Throw in a hefty pinch of dried woodsy sage, some water to dilute it all and give it a good steam and voila! You've made a simple and delicious dinner. Add some house fries, homemade mayo and for all you beer drinkers, a cold pint and I daresay you're as close to pub food nirvana as you're likely to get!


Here's what we're lookin' at:
-Two pounds of fresh mussels (preferably PEI if you're Canadian)
-Two cloves of garlic
-One sprig of rosemary
-One yellow onion
-One pudgy carrot
-One hefty pinch of sage
-Half a cup of red wine, preferably something light, feel free to use leftover wine (if such a mythical creature exists)
-Half a cup of water or broth
-a few basil leaves
-1/2 tsp. salt
-One dab of olive oil


Easy peasy, first step, rinse off your mussels very carefully in a large colander in the sink.

Quarter and peel your onions, chop your carrots into slices, peel your garlic and throw all of the above mentioned in the bottom of a large pot with a dab of olive oil on medium/high heat.

As the veggies soften and suck up the oil, add the salt and the sage and stir, lightly bruise the herbs by slapping them against your hand or the counter before adding them to the mix.

Keep cooking until the mixture in the pot sticks, leaving brown silhouettes against the steel. Douse in wine  (this process is called "deglazing") and stir until you've scratched all the brown of the bottom of the pot.

Add the water and mussels quickly to this mix and cover partially, turn the heat up and let it all steam for ten minutes


Drain mussels, pour beer, dish up fries and enjoy!


Thursday 14 November 2013

Charred Lemon Garlic Brussel Sprouts with Chipotle Mayo


With winter fast approaching and academia keeping me busy I've found myself to be stuck in an unfortunate nitty gritty little rut. On the one side, my most favorite time of the year (CHRISTMAS!) is on its way which is fantastic! But unfortunately, due to time constraints, I'm not quite done with fall recipes yet! Rutabaga soup, pumpkin chai lattes, squash and spice loaves, crabapple chutney, bacon and brussel sprout soup these all represent fall to me in the umpteenth degree. And so, it's pretty tragic, I feel like this semester hasn't given me nearly enough time to post a satisfying amount of fall food. Of course, one can argue that no one can ever have quite enough fall food.  Fall food being the delicious little gastronomical niche which combines the fresh harvest of early Autumn and the rich and hot foods that exemplify the best of winter. This mix up provides you one last nostalgic taste of fleeting summer with all the calorie laden oomph! of winter (yes "oomph!" is a word, exclamation mark included).


On this note, I do still have a little bit of Autumn left so it's time to get to it and post some of these yummy recipes up here. Here's one that I absolutely love as a side dish or as party food. These substantial and flavourful brussel sprouts combine sulfurous and green with savoury and spicy punch. The rich airy mayo piqued with some chipotle complements the brussel sprouts and citrus notes of the lemon zest oh so well! Although you may not be the biggest fans of sprouts, give this one a try, you may just be surprised, the speed at which these little mouthfuls evaporate can be quite shocking! 


Ingredients:
For the sprouts:
-water
-1tbsp. vinegar
 -A few handfuls of brussel sprouts, say... around two cups?
-Zest of one fat lemon, washed
-One hefty pinch of smoked paprika (sage or rosemary can also be good, shake things up!)
- One fat clove of garlic, minced
-1-2 tbsp. of cooking oil, I'd stick with canola because things are going to get HOT! (sidenote, never use olive oil at high heat, it gets a tad sketchy)
-Copious amounts of salt and pepper, preferably in large chunks, pretend you're seasoning fries

For the mayo:
-Half a recipe of homemade mayo (due to the problems of splitting eggs, I'd suggest making the whole recipe and using leftover mayo on sandwiches or to make some scrumptious salad!)
-1/4 c. of sour cream
-Lemon juice to taste
-2-3 tbsp. canned chipotle, cut up

First up, cover the brussel sprout neatly in water

Sorry for the blur folks, shooting with a prime lens while pouring water is tougher than it sounds!
Add a tad of vinegar (approx. 1 tbsp.) agitate for a bit and let soak. Meanwhile, preheat the oven to 400!


By the time the oven has preheated, drain the sprouts, making sure to not mix the grit that has likely settled on the bottom of your bowl back into the sprouts.


Halve the sprouts, removing the bottom nibs if they've hardened. As mine were freshly broken off the stem, they were soft so I left them on. Mix halved sprouts into a bowl with oil, salt, pepper and paprika, coating evenly.


Spread the sprouts out onto a baking sheet, making sure (as much as possible) that the sprouts don't touch each other. Slide into the oven, put a time on for 15 minutes.


While the sprouts are cooking, make the chipotle mayo ie make the mayo, add the other ingredients and tadaa, you're done there. I don't have a picture of the mayo making process so instead I offer you this picture of pumpkins.

Yay, pumpkins!

Alright, so you should be done with the mayo now and your timer should be ringing your ear off so remove the sprouts from the oven, flip them all and throw them back in for another 10 minutes.

After 10 minutes have elapsed (you can do some dishes in the meantime) remove the sprouts from the oven and sprinkle the minced garlic and lemon zest onto them before throwing them back into the oven for a final 5 minutes. Why the time lapse you may ask?  Because burnt garlic and lemon tastes naaaasty and high temperature cooking like this is not friendly to such small particles of food!

Ok, now your sprouts should be done and look something like THIS!

They should be less blurry though, don't eat blurry brussel sprouts, they might be dangerous.


 Now you can arrange the little critters on a plate with a ramekin of full of chipotle mayo and happily chow down, like so:

Guest star: Elias' hand


Enjoy!

Tuesday 5 November 2013

Vibrant Sweet Chilli Jelly


Here's one to keep you warm throughout the winter! A few weeks ago, had you stumbled into my kitchen you'd have found me feverishly stirring a steaming cauldron of capsaicin laden chillies. I was mixing the fiery flavour of an overly generous crop of chillies (six peppers to a plant? more like sixty!) into twenty six little pots of concentrated happiness and warmth. This jelly is both sour and sweet mixing summery chillies with tart apple cider vinegar and some mellowing sugar and pectin to make a thick jelly that goes soooooo well with strong cheese or smokey charcuterie. This recipe is loosely inspired by Nigella Lawson's own approach to chili jelly BUT made somewhat spicier, so if you like hot, you're in the right place. As well as using more chilies and not seeding them, I also used homegrown chilies and they don't tend to all ripen at once. This led me to use a mix of green and orange chilies making for a nice warm orange as opposed to scary red. While I'm at it, I recommend storing the jelly in a wee 125ml jar and accompanying it with chocolate truffles and a bottle of good red wine in some snazzy wrapping to make one nice gift (Christmas anyone?) it'll certainly be appreciated! If you're feeling particularly adventurous, don't hesitate to try the jelly on good vanilla ice cream or with those aforementioned truffles, don't kick it till ya try it!


**On sterilizing: Always make sure to sterilize all of your jars and tools, while I tend to boil everything some people heat it all in the oven at 250, look it up, do it well and right. Botulism is no joke! Also, when canning always make sure to prep more jam jars than required, better to have more ready than to be stuck with not enough!

Ingredients:
-675 gr. long fresh red chilli peppers (do shake out some of the seeds so it isn't too overwhelming!)
-225 gr. red peppers (unseeded)
- 3 kg. sugar 
-1800 ml cider vinegar   
-168g (6 oz.) Pectin Powder


1) Prepare jars and tools.
2) Pass chillies, pepper and about half of the vinegar through a blender until if forms a thick mush, if it does not blend, don't hesitate to add some sugar or vinegar to help the machine do its jobs.
3) Empty blender into a large pot, add all ingredients except pectin, bring to a boil for 10 minutes.
4) Once the liquid has started to thicken into a syrupy mixture, reduce the temperature until no longer boiling, add pectin and whisk in vigorously to prevent clumping.
5) Let sit ten minutes or so before carefully ladling the jelly into jars, seal and store.

Most people describe canning as a way to keep a taste of summer for the cold winter months...well let's just say that with this recipe you can keep a bit of the summer heat too!


Sunday 13 October 2013

Quick & Healthy Chickpea Chard Stew

This recipe is a testimony to the fact that healthiness and tastiness can be combined with simplicity in a fast one pan dish. A few simple ingredients, a bit of heat, and this dish will make it to the table within twenty minutes! Although it relies primarily on chickpeas this meal is French inspired in the sense that it relies on a few fresh ingredients and good execution to make something with good flavour and smooth mouth feel. It's also an easy meal to make vegetarian, simply use olive oil and vegetable broth and throw in a tad more salt, maybe some soy and voila! Take a chance and whip this together when you want a fast healthy dinner on a busy night, you won't be disappointed.


-1 can chickpeas
-1 large bunch of chard (approximately 15-20 leaves, don't worry you'll be surprised by how much it reduces to!)
-2 yellow onions
-3 cloves of garlic (crushed)
-1 large tomato
-1 1/2c. Broth (I used the boiling water of a ham)
- 1 teaspoon of bacon dripping or olive oil
-Pinch of paprika
 -Salt/pepper to taste

1) Melt fat in a pan on medium
2) Chop onion and add to fat, cook until soft, add garlic and paprika, cook until fragrant
3) Add chickpeas and cook until dry
4) Coarsely chop tomatoes and chard, add it to the garlic chickpea mixture
5) Once the vegetables have reduced and begin to stick to the pan add the broth, cook until thickened to a stew like consistency. Serve hot!


Thursday 3 October 2013

Oma's Plum Dumplings


For as long I can remember the smell of my oma's plum dumplings has managed to bring a crowd to the table. The original recipe, referred to as "bayrische zwetschenknödel", survives today in an old yellowed German cookbook, smelling of history and riddled with Oma's loving scribbles.While I can't be sure about now, I do know that these simple dumplings used to be common in Germany. Made in both the North and South the recipe for this rustic staple seemed to have been quite flexible seeking largely to be cheap, simple, easy and tasty. While some people did choose to fill their dumplings with the plump sour cherries that Germany is famed for, others used the equally proliferous (and delicious!) deep purple plums (Zwetschge) of Germany. Here in Quebec sour cherries are, to my endless dismay largely unavailable,  but we are however lucky enough to get quite the haul of plums in fall! The best plums to use in this recipe should be small and dark purple, the ones that are nearly black. If your plums are extra soft, seemingly overripe and starting to wrinkle bordering on being jam material then they are absolutely perfect for this! While you can also use the fatter red plums which tend to be available around the same time, they do tend to be somewhat less juicy, not to mention being substantially bigger so I'd recommend using only half of one per dumpling.

Now although it might seem weird to have potato in your dumpling, bear with me, the earthy taste goes surprisingly well with the juicy sweetness exploding from a ripe plum, a touch (of shovel-full) of sugar, cinnamon and rendered butter on top doesn't hurt either!

** Before you begin making this recipe, be aware that once riced, the potatoes need to sit overnight before assembling the dumplings! Once you're past that step it's easy peasy!

Ingredients

-1 1/4kg Potatoes
-2 eggs
-140g flour
-15-20 small black plums at room temperature
-hefty pinch of salt
-Butter for frying, sugar and cinnamon to taste

Boil potatoes until completely softened and possible to pierce with a fork, I'd recommend about 20 minutes at a rolling boil

 Drain potatoes and let cool

Peel and rice potatoes, put them in an airtight container and refrigerate at least overnight


Mix the flour and salt


Integrate the flour mixture with the riced potatoes.

Why yes, my mixing bowl is indeed a collapsible salad spinner, apartment life is definitely glamorous!


 Add an egg (do a better job of cracking it than me!)


 Mix the dough until thick and somewhat tacky


 Pit (or halve) the plums


 Take a handful of dough, roll it into a ball and flatten, expect lots of sticky squishy squashy


Seal the plum in a wee blankie of dough


  Bring water to a boil


and plop one dumpling to test the dough, if the dumpling floats back to the surface without disintegrating...


 you're in business!

 Remove all dumplings with a slotted spoon, NOT with pincers, I don't yet own a slotted spoon (whoops!)


 set aside and let drain at least 10 minutes


 Heat a *generous* amount of butter in a large pan


until you have a thick coat along the bottom, slice dumpling and fry each side of the dumplings until browned

yummmmm

After removing dumplings from pan, add more butter and cook it down, I love to cook it until it's a lovely light brown bringing up the nutty flavour of a good beurre noisette


Pour melted butter on cooked dumplings and dust with a mix of sugar and cinnamon, serve hot as either a light rustic dinner or a heavy dessert.

Or just enjoy them with the butter!

The step by step photography credit goes to my talented roommate Elias!

Monday 16 September 2013

Smoked Salmon Salad with Honeyed Mustard

Why yes, yes, this is indeed another salad recipe...however, it is an awfully tasty one! This light meal salad merges bright colours, rich flavours and delicious protein to make a filling, nutritious and decadent salad. In my opinion the summery crisp crunch of fresh romaine marrying the smoky salmon is the perfect way to celebrate the transition between summer and autumn. In this salad you'll find poetry of texture in the velvety softness of the salmon which is complimented by the luscious mouth-feel of mustard and honey. Couple this with the tang of red onion and the woodsy crunch of roasted walnuts and I daresay you have an easy but decadent light supper ahead of you! 

*Caution, this recipe was winged so all quantities listed are approximate, bear with me though, you can't mess it up! Follow the approximations and feel free to let go a bit, if you taste each element of the salad separately you should be able to gauge about how it's meant to taste together, one tip? Better to sweeten less than more...now get to it!

Ingredients: 

For the Salad:
-Half a romaine lettuce washed and dried
-1 slice of red onion, cut into long strips
-About 30g of smoked salmon
- 1 Handful of roasted walnuts (you can roast walnuts in a preheated oven on a rack at 350 for 3-5 minutes, let them cool completely before using)
-1/2 small garden cucumber

Vinaigrette:
-1/2 tsp honey
-1 tsp dijon mustard
-dash of rice vinegar
-sprinkle of dried parsley

1) Cut onion and soak in cold water
2) Tear romaine into bite sized pieces, peel cucumber and combine
3) After about 5 minutes, add the onion to the lettuce alongside the salmon and walnuts
4) Make the vinaigrette, coat the salad and season liberally with coarse black pepper

Sadly when I took the photo I had no walnuts, however, if you would like some briny taste to your salad feel free to add some capers!


Monday 9 September 2013

Simply Summery: Black Bean Salad with Lime

When I originally wrote this recipe corn season was in mid swing. The summer, the heat and this pleasant thing to eat were all readily available. However, with moving, the start of my MA and a complete change in lifestyle this post was delayed, delayed, delayed, whoopsies! Needless to say, although the cold is returning and us students are back to the grind we're lucky enough to be able to enjoy the end of our late summer bounty.

On that note, nothing quite says late summer like the fresh firm flavour of good local corn on the cob and juicy fresh peaches. While peaches are quite averse to Quebec weather, a tragedy which forces us to rely on our dear neighbours les ontariens, no one can complain about our corn crop. For those of us who eat corn on the cob, and who don't see it simply as something that is "pour les vaches" ie for cattle, like some Parisian urbanites I've heard of, we are familiar with the amazing taste provided by only the most perfectly ripe ear of this summery carb.With this in mind, here is a perfect little recipe that does justice to this tasty veggie and makes a lovely home for all that corn you may have cooked in an overzealous barbecue moment, a crime we're certainly all guilty of.


Duplicate it according to how much leftover corn you have, this makes a nice fresh addition to a potluck!

Ingredients:

-2 green onions
-Juice of 1/2 lime
-1 cup black beans
-1 mango
-1 corn
-dash of tamari (or other light soy sauce)
- A small handful of cilantro (optional)

Directions:
1) Remove all corn kernels from the cob, running a sharp, thin knife down it.
2) Prepare the beans (either by rinsing canned ones or re-hydrating dried ones) and combine with the lime juice.
3) Chop the green onions and cut the mango into bite-sized cubes, combine all ingredients. The main goal here is to get everything bite-sized (ignore my over sized mango chunks, I was being lazy) so a well mixed spoonful gets you a blast of sweet, salty, starchy, fragrant and sweet.
4) Enjoy alongside some fish tacos with chipotle mayo and a big, tall, cold cocktail in the sun!