Sunday 31 March 2013

Good Wishes for Easter + Green Beans with Mint, Lemon and Garlic Emulsion and Fleur de Sel

Springtime is upon us! Something that  finally seems clear as rain trickles down the roof, slowly eating away at the three foot snow banks in front of our house. Up here in not so picturesque St-Lazare the snow shall soon give way to torrents of water, mud and general grossness. Thankfully grass, flowers and blossoms will soon be blooming forth and letting us forget the cold of winter and the smelly "in-between" period.Although it can't quite get here fast enough we know that t-shirt weather is on the way. One sure sign of this? Easter!

Be it Easter,  Passover or whatever other festival your faith (or lack thereof) celebrates, spring is a period of rebirth so be happy, be festive, grab your friends and family close and get your party on (dinner party that is!).

In case you haven't had your little family (or friend!) Easter get together yet, Shannon came up with little place settings. All you need are some flowers (fake or not), eggs, a bit of dye, some moss and stamps or a marker and these little critters can be assembled in a jiffy! They make for a neat little outlet through which you can release your inner Martha Stewart!


Oh wait, I promised you a green bean salad didn't I? I guess I should give that to you instead of ranting about pretty eggs, sun and funny smells! You'll have to excuse me though...I didn't notice my camera's settings were all wrong when I took quick pictures, the bean salad was the only one to make it out semi-nice!

Green Beans with Mint, Lemon and Garlic Emulsion and Fleur de Sel


This recipe is best if you can let the emulsion sit for a bit and really get those flavours out there! Otherwise it's quick to assemble and much adored, it didn't even last the first go around the table!

Ingredients:
-1 Package of green beans (I'm so sorry I didn't weigh them, look at the photo? I'd say 3-4 big handfuls)
-2-3 Large sprigs of fresh mint
-3 1/2 tbsp. Good olive oil
-Zest of one lemon
-Fresh lemon juice to taste (I used a bit less than half a lemon)
-1 Large clove of garlic
-2-3 hefty pinches of fleur de sel (Fleur de sel is a special hand harvested flake salt collected from salt marshes, mine is from Guérande, in France. It is expensive but totally worth it! If you don't have access to it, you can remove it from the recipe but it really is worth it!)

1) Zest lemon and juice half of it. Rinse mint, prepare beans and remove the papery skin from the garlic.
2) Blend mint, garlic and zest in a small food processor adding oil gently between pulses.
3) Let sit for a few hours if possible
4) Steam beans until they reach desired consistency (everyone likes them differently! I like them crunchy)
5) Add lemon to mixture mix vigorously and coat beans
6) Dust with fleur de sel and serve hot!

Bread is good for scooping up the emulsion...or just for eating with fresh butter...


Monday 25 March 2013

Spiced Black Beans

Ah black beans, a staple of the South American diet, not mind blowingly tasty nor pretty but somehow deeply satisfying and comforting. This quick and healthy side-dish is loaded with protein and a delightfully convenient foodstuff for the overworked student, worker or parent. As essays pile up and the last dash required to complete my undergraduate degree are undertaken these beans have become a staple to my diet. This dish is in no ways unique, but it might just surprise you with its pleasant and smooth taste. It is adaptable to many dishes and great to pack into lunches, it stores well and reheats easily. These beans, are the absolute perfect filler food and are great to keep you going. Where refrigerator oatmeal has become routine to a few people who've given it a try, this might well become a part of your everyday lunch or dinner. For this reason, and because I know that I'm not the only busy one who likes to have something healthy available I share this little recipe with you, simple, tasty, nutritious.


Ingredients
-1 large can of black beans
-1 large yellow onion
-3 cloves garlic
-1 large tomato
-1 tbsp. olive oil
-1 hot pepper (optional)
-1/2 c. liquid (broth or water to taste)
-Optional: Pinch each of ground coriander, cinnamon and oregano, feel free to switch up the spices too (cumin is lovely as is paprika!)

1) Crush garlic and chop onion and tomato
2) Heat oil in pot, add garlic, onion, hot pepper if using and spices, cook until soft and fragrant
3) Add tomato to garlic and onion mixture, cook until tomato has softened, add beans and liquid
4) Continue to cook, adding liquid if necessary, mash with potato masher until it achieves desired consistency
5) Serve with rice and anything else, it's great with Mexican food or poultry

Saturday 16 March 2013

Cedar Plank Salmon with Blood Orange Salsa

I have a confession to make, although I now own a nice hand mixer, good knives and all sorts of fancy cooking toys, I don't own a bbq. Yes, you read that right, what can I say, according to gender stereotypes I must simply not be a man *snif snif*. I must say though that even if I don't have a bbq and do not conform to the beer swigging, ugly apron wearing, manic steak grilling football fan that the media wishes I was, I do LOVE barbecued and smoked food.

It was night time, it was busy, it was frantic and I had no photo lights please don't judge the dish by these atrocious pictures, it deserves better!


        If you've been following the blog for awhile you'll know that in summer months I do tend to make due, as seen with my macgyver-esque bbq crafted from random bits of rock and brick in the back of my parents yard last year. However, I absolutely relish the opportunity to cook on the real deal. Be it charcoal or gas with all those swanky dials (all two of them! My brick pile has no swanky dials) there's something amazing about the easy outdoorsy-ness of barbecuing. All this to say that a week or so ago I had the chance to cook using a bbq. Not only was this exciting because I don't often do it , it was also in winter and for a party!

       It was also for a lovely event, a surprise birthday for Shannon's mum Kate in which I was cooking for about 20 people. After a brief caucus in which we tried to work out an easy but exotic meal for a bunch of people, we came to the conclusion that cedar plank salmon would be fantastic and wouldn't leech any much required kitchen space away from the rest of the operation. Bursting with exotic flavors and coated in colourful blood orange salsa this recipe, if I may say so myself, this dish is absolutely irresistible to salmon lovers with a flair for the exotic. Shannon's dad Alex, who normally works the bbq (a man who although he owns a bbq and drinks beer still does not fit the much loved media stereotype, sorry) decided to give me carte blanche on this one. So remembering previous cedar plank salmons we'd made together and thinking of summer we cooked two huge filets of salmon with a thick ginger garlic glaze and topped it with an almost unbelievably fresh tasting salsa. So if you're having some people over, dreaming of summer or you just miss using your dear bbq, this one is for you. Don't worry, it's absolutely worth cleaning your bbq and standing out in the cold for, I promise. By the way, did I mention that it's healthy and delicious? Now why are you still reading this and not running out to get the ingredients yet???

On a side note, I've seen different takes on this glaze, this one is a version done from memory replicating something Alex once found online, possibly on epicurious?
 

Prep time: 1h (30 min. active, planks need to soak in cold water for at least half an hour)
Cook time: ~10 min.

I reduced the portion to family feeding size so serves about 5 as a main dish
Ingredients:

For the fish and glaze (measurements are approximate, do it to taste):
-1 large filet of salmon, ours was perhaps one pound or so
-1 1/2 inch ginger, grated on a microplane
-2 cloves garlic, crushed and minced
-2 tbsp. honey or maple syrup
-1-2 tsp. tamari soy sauce
-zest of one orange (optional)

Specialized equipment: untreated cedar planks large enough to fit your fish (you can cut it or use two planks if you wish), propane bbq

For salsa:
-3 Blood oranges (normal oranges work fine they just don't have that slight grapefruit-like aroma or brilliant colour!)
-1 Red onion
- 1 1/2 Sweet peppers (I bought a pack of tricolor peppers and used half of each to give it a particularly brilliant presentation)
-1 inch fresh ginger grated on a microplane
-2tbsp. Tamari soy sauce
-Juice of half a lemon
-1 Small handful of fresh cilantro

1) Soak cedar planks for at least half an hour up to 12 hours for best results
2) Chop oranges, red onion and peppers into small bite-sized pieces, as similarly sized as possible
3) Add soy sauce, lemon juice and chopped cilantro to  orange mix, let sit.
4) Mix ingredients for glaze and cook on medium heat for 10 minutes or so to reduce it, the thicker it is, the better it sticks to the salmon!
5) After 20 minutes or so, try the salsa and adjust it to taste, a teaspoon of honey or maple syrup might be needed if your oranges are particularly acidic.
6) Light the bbq and heat it to high, add planks
7) Lay fish on top of planks, close bbq and heat for about 10 min. Cut into it and check for rawness after this, if there is only a bit in the center, a thin pink line, that's perfect, remove the salmon from the bbq, it will continue cooking after you've taken it out. Make sure not to overcook it and enjoy topped generously with salsa!

Yummy yummy salsa


Friday 8 March 2013

Banana Berry Refrigerator Oatmeal

Refrigerator oatmeal has been popping up all over the internet in the last few months and has spread across Pinterest like a nutritious and rustic plague. Being constantly harassed by it in its many forms I finally concluded that it was my duty, to write a post about it for my large audience of approximately five and a half people (I kid, I kid, there are at LEAST six of you guys). Needless to say I attempted it, fearing that it was yet again one of those convenient health foods that everyone pretends to like and then lets slide back into obscurity. The verdict? It's surprisingly yummy and oddly convenient! Refrigerator oatmeal, if well assembled is like bizarre lovechild of granola and rice pudding. It has a thick wholesome consistency, is cool and refreshing, nutritious and very tasty! It doesn't become semi-concrete goop a la oatmeal but instead becomes thick with chewy bits of oatmeal, thus the rice pudding comparison. It's important to not that this is an overnight recipe, so although convenient it does require some forethought. Other than this, the recipe is super easy, extremely convenient and can be made, transported and consumed in jars...don't get me started on jars. Needless to say, it's a lovely recipe, although I saw it all over, I settled on Ewa's recipe as a basic template which I altered. She's over at Delishhh if anyone would like to give her lovely recipes a gander!


Ingredients:
1/4c. Plain, full-fat yogurt
1/4c. raw oats, not instant
1/2 c. mixed berries or other fruit (I used raspberries and strawberries)
1/3 c. milk or soy milk
1 tsp maple syrup
1 tbsp. sweet jam (I used cherry)
1 pinch of salt
A few drops of vanilla
1/2 banana

1) Mix all ingredients except banana in a jar, seal and store in refrigerator overnight
2) The next morning garnish with slices of banana and serve


Sunday 3 March 2013

Cooking Knives 101

Ok people this is not just a blog post, it's an intervention. If you're someone who cooks a lot or someone who would like to start cooking a lot you need good knives, really. The world is sadly full of bad knives...baaaaaad knives and worse than that? It's full of dull knives! If you are like I was a few years ago, someone who cooked exclusively with a "sharp" pairing knife that was kept in your drawer, this post has the capacity to change your cooking experience forever.

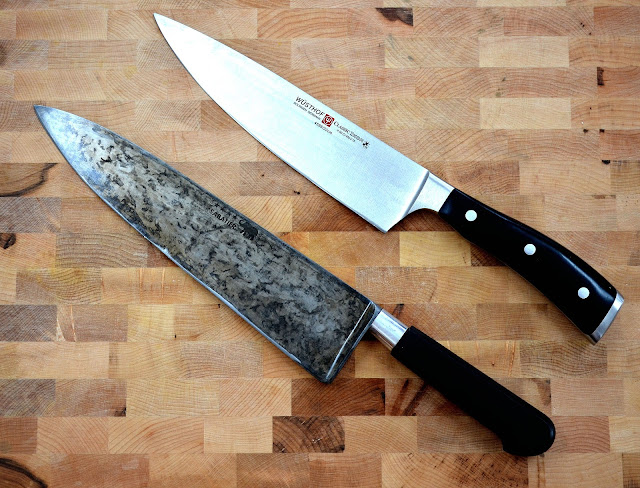
Pictured above: Real Knives
Ok, SO! Where can I start... well let's just go with a few different types of knives. Everyone is familiar with the classic serrated bread knife so I don't need to get into the details on that but here are a few other common ones.

From top: 10 inch chef's knife (carbon steel), 8 inch chef's knife (stainless), tomato knife, pairing (or petty) knife, cleaver
The Chef's Knife 


The chef's knife is the workhorse of the kitchen, big and heavy this critter is used for everything from chopping onions to cleaving squash and cutting lanyards off peppers. Many people own knife sets yet never use the Chef's knife fearing it's weight and heft which can seem a bit menacing. However, once you've learned how to grip the knife and use your other hand in a grip known as "the claw" you'll be safer than you'd think! If your knife is properly sharpened and has good heft to it, it will cut right through things instead of slipping off, which is one of the most common knife injuries. This is why a good, sharp chef's knife is actually crucial to safe cooking, doesn't hurt that it looks cool too! A chef's knife gains most of its importance from its size and weight, cleaving through all sorts of food but also being the best profiled for chopping. Knives with a German profile (right) tend to have a rounded belly on the blade which allows you to rock chop, sliding back and forth across the belly to have that effect that chef's love to show off. French profiled knives (left) have less of a belly and tend to have thinner blades, they sacrifice the ability to rock chop well for more control and an often sharper blade. If you're going to put money into a knife, this one is definitely the most important!The chef's knife is splurge worthy, and it isn't uncommon to drop a good 150$ or more for one. There are some decent lower end ones available in the 30-40$ range made by brands like calphalon, victorinox and forschner (the two last ones being owned by the same company) they're good for the cost but if you're serious about getting good knives I'd recommend spending a lot the first time and never spending again. A great higher end knife for less than 200$ is the antique sabatier pictured above on the left, it's a lovely knife so far and fulfills all expectations given to me by those who suggested it!

The Petty


  The petty (pairing) knife is probably the knife that is found most often in people's kitchens. Coming in all shapes and sizes, available with serrated or straight edges, this little knife is cherished for its agility and easy control. It's great for removing stems from fruits and vegetables, seeding and if it's thin enough it can be slipped through joints on meat if you lack a boning knife. This is a great knife to have around for the little things but not great for the bigger stuff like chopping an onion, best to leave that to the chef's knife! Different shapes lend themselves to different uses of course and there are a whole bunch of different pairing knife profiles to try out. It's good to know where you prefer your point to be before buying a nice one. However, a cheap straight edged pairing knife (or 5) from the dollar store can be ok when starting out. For a bit more I'd recommend a few victorinox pairing knives with plastic handles available for 5-6$ each. 

The Slicing Knife


The slicing knife, pictured above the petty, is what most meat eaters would consider the third most important knife to have around. As I don't often indulge in meat, I rarely reach for it, but this long, thin and rather graceful looking blade is great for producing nice uniform slices of meat. They're often thin and extremely sharp with many being available with completely straight blades. I picked up this particular one from a great brand from a thrift store (lucky me!).

Other information

It's important to know the different parts of a knife so you can understand all the debates around different shapes and such. Although I already mentioned a bit about blade profiles, for more information on what parts of the knife are where, I found this handy dandy diagram right here: www.cookingforengineers.com/article/130/Knife-Parts

As you can see from the diagram, many of the knives pictured here are "full-tang" meaning that they feature a tang reaching throughout the handles, sided by two scales and fixed with rivets. These knives are generally considered as more solid and reliable, a mark of a good knife. However, the old fashioned "rat-tail" pictured on the two knives above that do not have a full-tang is also pretty sturdy and I've yet to here bad reviews from anyone who owns one. However, they're not currently in favour and are truly a hallmark of a long ago age in knife-making. The large chef's knife in the first two photos is only a few decades away from being a century old and it's a fantastic piece.

This is only the first of a few posts on knives, more will be said at a later time about technique, sharpening, honing, brands and a whole bunch of other topics.

a few parting tips:
 -Never store good knives in a drawer, use a block or magnet
- Never, ever put them through a dishwasher
-Use good knives on good cutting boards, optimally end-grain wood (that checkerboard pattern you saw), if not, at least make sure it's a wooden board
-Wash and dry your knife as soon as possible after use, this is doubly important with carbon steel knives
-Always keep your knives sharp, they're safer that way

For anyone looking to buy a knife, I highly recommend the forums over at cheftalk.com, they guided me through buying some of my knives and were a huge help. Hope this helps!